Having completed my reviews of the David Michelinie/Bob Layton IRON MAN run the other day, I thought I'd take a bit of time to write about the actual book itself. As I noted some time back, this book is officially the IRON MAN BY DAVID MICHELINIE, BOB LAYTON, & JOHN ROMITA, JR. OMNIBUS. It is a large, sturdy tome, weighing in -- according to Amazon.com -- at five-and-a-half pounds, and totaling 944 pages.
The dustjacket is slick and shiny, showcasing an image of Iron Man, in his classic armor, illustrated by John Romita, Jr. in 2012. As with most Omnibus volumes, there were two cover options: the standard edition, which I went with, or the Direct Market edition, available only through comic shops, featuring an unaltered image of the cover to issue #144. I usually tend to go with the Direct Market covers for these things, as they typically feature covers from the original series' run, as is the case here.
Showing posts with label Iron Man by Michelinie/Layton. Show all posts
Sunday, April 13, 2014
Wednesday, April 9, 2014
IRON MAN #157
"SPORES!"
Plot/Pencils: Alan Kupperberg | Script: David Michelinie | Inks: Dan Green
Letters: Joe Rosen | Colors: Bob Sharen | Editor: Jim Salicrup
Editor-in-Chief: Jim Shooter
Plot/Pencils: Alan Kupperberg | Script: David Michelinie | Inks: Dan Green
Letters: Joe Rosen | Colors: Bob Sharen | Editor: Jim Salicrup
Editor-in-Chief: Jim Shooter
The Plot: Tony is working late at night on his armor when the power to his lab goes out. Changing to Iron Man, he finds that a Stark employee named Sylvia Karnowsky has drawn energy to her experiment through his lab. Before he can reprimand her, Iron Man is beamed to a sentient spaceship in orbit, where he helps the ship fight off some alien spores. Following the skirmish, Iron Man is beamed back to Earth.
Continuity Notes: This has to be an inventory issue. It's a done-in-one adventure, with absolutely no references to ongoing continuity. Presumably, with Michelinie leaving the series, Jim Salicrup ran this story while looking for a new writer.
My Thoughts: So this is how the David Michelinie/Bob Layton run ends -- not with a bang, as they say, but with a whimper. Though to be fair, I suppose last issue was really the end of Michelinie's term as writer. This is just a lackluster coda. Still, though, it's always a little depressing to get to the end of a classic comic book run and watch it fade slowly and limply to its conclusion. Much like watching the final season of a formerly favorite TV show right before its cancellation.
Monday, April 7, 2014
IRON MAN #156
"THE MAULER MANDATE!"
Writer: David Michelinie
Breakdown Art: John Romita, Jr. | Finished Art: Pablo Marcos
Letters: Joe Rosen | Colors: Don Warfield | Editor: Jim Salicrup
Editor-in-Chief: Jim Shooter
Writer: David Michelinie
Breakdown Art: John Romita, Jr. | Finished Art: Pablo Marcos
Letters: Joe Rosen | Colors: Don Warfield | Editor: Jim Salicrup
Editor-in-Chief: Jim Shooter
The Plot: Scott Lang is taking inventory at Stark International's newly acquired subsidiary, the Cord conglomerate, when he discovers the Mauler battlesuit. Before he can act on his discovery, Scott is knocked out by a mercenary named Brendan Doyle, who takes the armor and attacks Stark International. Doyle is driven away by Iron Man, with some help from Rhodey, who the mercenary recognizes from their time in the same mercenary troupe.
Doyle later breaks into Rhodey's apartment and coerces him into getting them both past Stark security so he can carry put his mission to destroy all records of the development of the Mauler suit. But Iron Man again arrives to confront Doyle, and Rhodey again a aids our hero. Finally, given a choice between killing Rhodey or abandoning his mission, Doyle retreats, thus canceling a years-old debt between the two.
Wednesday, April 2, 2014
IRON MAN #155
"THE BACK-GETTERS!"
Writer: David Michelinie | Pencils: John Romita, Jr. | Inks: Dan Green
Letters: Joe Rosen | Colors: Bob Sharen | Editor: Jim Salicrup
Editor-in-Chief: Jim Shooter
Writer: David Michelinie | Pencils: John Romita, Jr. | Inks: Dan Green
Letters: Joe Rosen | Colors: Bob Sharen | Editor: Jim Salicrup
Editor-in-Chief: Jim Shooter
The Plot: Gerrard, the son of Stark International's P.R. director, Artemus Pithins, is beaten after hours at his high school. The next day Mr. Pithins confides in Tony that a number of students have recently been hospitalized at the school, including a group who took some bad drugs and a young man who was run over by a car. Pithins asks if Iron Man might attend the upcoming career fair, and Tony agrees.
At career day, Gerrard is cornered again by a group of students, but his father comes to his aid. The students inform Pithins that Gerrard distributed the bad drugs on behalf of the student who had been run over, and these students want revenge. Pithins convinces them to forego violence and talk their problems out instead.
Meanwhile, outside, Iron Man stops a runaway tank, present for career day, which has been activated by a clumsy student, from demolishing the school.
Monday, March 31, 2014
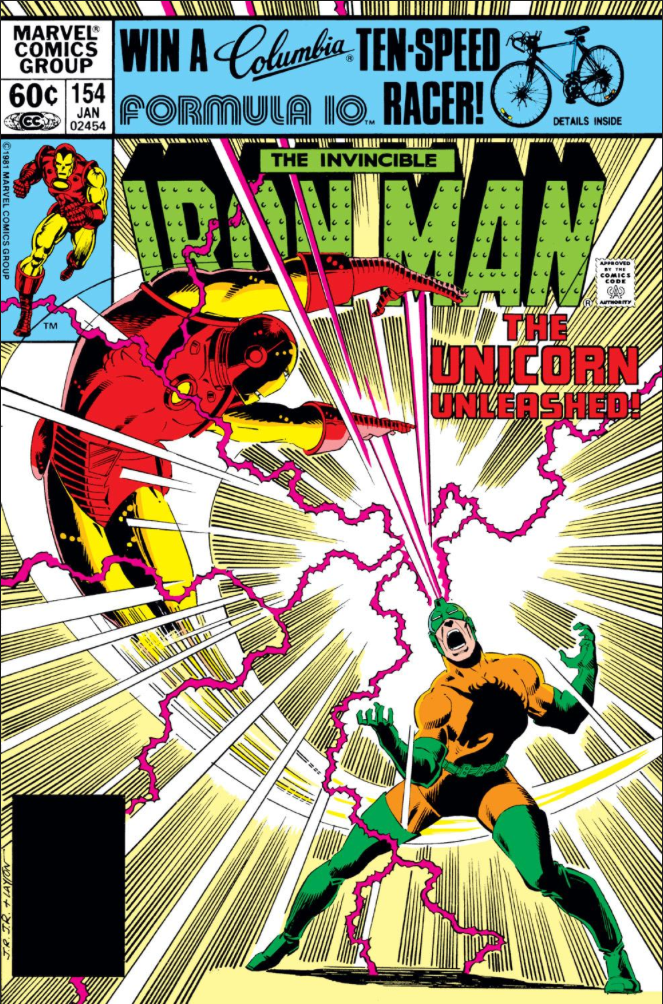
IRON MAN #154
"THE OTHER SIDE OF MADNESS!"
Writer: David Michelinie | Penciler: John Romita, Jr.
Inkers: Dan Green, Chic Stone, & Bob Layton
Letters: Joe Rosen | Colors: Bob Sharen & Don Warfield
Editor: Jim Salicrup | Editor-in-Chief: Jim Shooter
Writer: David Michelinie | Penciler: John Romita, Jr.
Inkers: Dan Green, Chic Stone, & Bob Layton
Letters: Joe Rosen | Colors: Bob Sharen & Don Warfield
Editor: Jim Salicrup | Editor-in-Chief: Jim Shooter
The Plot: On his way to the Yonkers Raceway for some horse races, Iron Man is attacked by a mysterious enemy, who escapes before he can be identified. Our hero proceeds to the races, but is preoccupied and returns to Stark International to find the complex under attack by a very insane Unicorn, who is the same villain that assaulted Iron Man earlier.
Iron Man battles the Unicorn, but uses up all his power reserves in the process of saving several Stark employees. Unicorn prepares to deal the killing blow on behalf of The Other, but Iron Man convinces him The Other has forsaken him, having returned to Russia. The Unicorn departs to travel to Russia and find his missing master, but in his unhinged state, he walks straight into Long Island Sound, apparently drowning.
Wednesday, March 26, 2014
IRON MAN #153
"LIGHT MAKES MIGHT!!"
Plot/Writer: David Michelinie | Plot/Finished Art: Bob Layton
Pencil Art: John Romita, Jr. | Letters: Joe Rosen | Colors: Bob Sharen
Editor: Jim Salicrup | Editor-in-Chief: Jim Shooter
Plot/Writer: David Michelinie | Plot/Finished Art: Bob Layton
Pencil Art: John Romita, Jr. | Letters: Joe Rosen | Colors: Bob Sharen
Editor: Jim Salicrup | Editor-in-Chief: Jim Shooter
The Plot: Iron Man battles the Living Laser inside the Heaven's Hand complex, while Rhodey ferries Bethany and her injured husband Alex back to the United States. The Laser uses so much power against Iron Man that he begins to overload. He attempts to reconstitute himself before it's too late, but Iron Man stops him and the Laser disperses into particles of light.
Later, back in the U.S., Bethany tells Tony that she will stay with Alex to help him through his rehabilitation. She and Tony part ways, and Tony sheds a tear for the end of their relationship.
Continuity Notes: A footnote tells us that Bethany's and Iron Man's rescue of Alex took place last issue. The Laser then spends a couple pages recapping his recent history: Count Nefaria doubled his power in AVENGERS #164 - 166, but the boost was only temporary. When it wore off, the Laser found that his body now constantly absorbed light, and that he would eventually overload and die. The East Germans offered to help him expel the excess energy by using it to power dormant weapon satellites in Earth's orbit.
The Laser is humanized a bit when Iron Man asks if the thought of betraying his country bothers him and he admits that yes, it somewhat does.
Monday, March 24, 2014
IRON MAN #152
"ESCAPE FROM HEAVEN'S HAND!"
Plot/Writer: David Michelinie | Plot/Finished Art: Bob Layton
Pencil Art: John Romita, Jr. | Letters: Joe Rosen | Colors: Glynis Wein
Editor: Jim Salicrup | Editor-in-Chief: Jim Shooter
Plot/Writer: David Michelinie | Plot/Finished Art: Bob Layton
Pencil Art: John Romita, Jr. | Letters: Joe Rosen | Colors: Glynis Wein
Editor: Jim Salicrup | Editor-in-Chief: Jim Shooter
The Plot: Iron Man scouts an East German research complex called Heaven's Hand, then returns to the Stark Inernational office in West Germany, where he analyzes his findings. The next day, inside Heaven's Hand, Bethany is brought before another prisoner -- her "late" husband, Alexander van Tilburg. The Germans explain that they faked the death of Alex, East Germany's ambassador to the United States, so that he would reveal to them any information he might have regarding American sleeper agents in Germany. But the drugs they used scrambled Alex's mind, and now the Germans need Bethany to help them inside his head.
That night, Iron Man sneaks into Heaven's Hand, then changes into disguise as an East German major. He has Bethany brought to him, then leads her to a closet for a private conversation. Bethany berates Tony, telling him that her capture was part of her plan to rescue Alex. Mercenaries were to attack the complex, but the equipment Bethany needs to escape with them is in her cell. So she convinces Tony to change into Iron Man and aid her escape.
He does so, and makes short work of the complex's German defenders. Bethany, Alex, and the mercenaries board a plane piloted by Rhodey and escape, but Iron Man is shot down by the Living Laser before he can follow.
Wednesday, March 19, 2014
IRON MAN #151
"G.A.R.D.'S GAUNTLET"
Plot/Writer: David Michelinie | Plot/Finished Art: Bob Layton
Guest Penciler: Luke McDonnell | Letters: Joe Rosen
Colors: Bob Sharen & Don Warfield | Editor: Jim Salicrup
Editor-in-Chief: Jim Shooter
Plot/Writer: David Michelinie | Plot/Finished Art: Bob Layton
Guest Penciler: Luke McDonnell | Letters: Joe Rosen
Colors: Bob Sharen & Don Warfield | Editor: Jim Salicrup
Editor-in-Chief: Jim Shooter
The Plot: While Tony goes shopping for a new wardrobe with Ling McPherson, Scott Lang, examining the damaged Stark International lab complex, comes under assault by Stark's malfunctioning internal security system, G.A.R.D. (the Graduated Radical Automated Defense system). Scott changes to Ant-Man and eventually defeats the computer. Iron Man arrives to help, only to find Scott, back in civilian attire, waiting casually for him.
Returning to his temporary living quarters, Tony opens the newspaper to find that Bethany has been captured and branded a spy by the Soviet Union.
Continuity Notes: The Stark International complex is still undergoing repairs following Blacklash's rampage in issues 146 and 147. A footnote on the second page reminds readers of Iron Man's duel with Doctor Doom in the distant past as seen last issue. The following page presents a succinct recap of Tony's relationship with Bethany, as Tony reminisces about her yet again.
Monday, March 17, 2014
IRON MAN #150
"KNIGHTMARE"
A tale of magic and majesty told by
Plot/Writer: David Michelinie | Plot/Finished Art: Bob Layton
Pencil Art: John Romita, Jr. | Letters: Joe Rosen | Colors: Bob Sharen
Editor: Jim Salicrup | Editor-in-Chief: Jim Shooter
A tale of magic and majesty told by
Plot/Writer: David Michelinie | Plot/Finished Art: Bob Layton
Pencil Art: John Romita, Jr. | Letters: Joe Rosen | Colors: Bob Sharen
Editor: Jim Salicrup | Editor-in-Chief: Jim Shooter
The Plot: Iron Man and Dr. Doom arrive in Camelot, where a group of King Arthur's knights bring them before the King himself. Arthur allows Iron Man and Doom to stay the night as his guests while he determines what to do with them. However, Doom hypnotized a courtesan, forcing her to give him the location of the sorceress Morgana Le Fay, then departs for Morgana's castle. The next day, Iron Man promises Arthur that he will aid Camelot against whatever Doom has planned.
Meanwhile, Doom reaches Castle Le Fay, where he explains to Morgana that he seeks her tutelage in the mystic arts to aid him in rescuing his mother's soul from Mephisto. Morgana agrees, if Doom will first lead her army of undead warriors against Camelot.
Soon, Doom marches on Camelot with Morgana's legion, and Iron Man stands beside Arthur and his knights in the kingdom's defense. But Iron Man soon realizes that Doom could not have raised these warriors himself, and heads for Morgana's castle. Unable to counter Iron Man's technology with her magic, Morgana retreats to another dimension, her warriors dying upon her departure.
Enraged, Doom flies to Morgana's castle. Realizing any spells he might have learned are now gone with Morgana, Doom agrees to a truce with Iron Man. The pair dismantles components from their respective armors, crafting a device to return them to the present day. The gambit is successful, and Iron Man and Doom appear on a snow-capped Balkan mountain. They go their separate ways, with Doom vowing that they will meet again.
Wednesday, March 12, 2014
IRON MAN #149
"DOOMQUEST"
Plot/Writer: David Michelinie | Plot/Finished Art: Bob Layton
Pencil Art: John Romita, Jr. | Letters: Joe Rosen | Colors: Bob Sharen
Editor: Jim Salicrup | Editor-in-Chief: Jim Shooter
Plot/Writer: David Michelinie | Plot/Finished Art: Bob Layton
Pencil Art: John Romita, Jr. | Letters: Joe Rosen | Colors: Bob Sharen
Editor: Jim Salicrup | Editor-in-Chief: Jim Shooter
The Plot: Iron Man rescues a Stark International freighter bound for Latveria from a pirate attack, then orders the vessel to return to America rather than deliver its cargo. Soon, Tony Stark arrives at a regional managers' meeting at SI headquarters and berates then fires one of his men for selling electronic components to Latveria.
Meanwhile, Dr. Doom returns to the present day after studying magic in the distant past with the master mage, Cagliostro. Doom is informed that the electronics he was expecting have returned to the U.S. aboard the Stark freighter. Later, Iron Man stands guard over the electronics when agents of Dr. Doom arrive and best him, stealing the parts and departing.
The next day, Rhodey flies Tony to Latveria, where Tony is immediately approached by the local police. Serving Latveria's current monarch, King Zorba, they provide Tony with the location of Doom, currently considered a criminal, in hopes that Iron Man will take him out. Shortly, Iron Man arrives at Doom's castle and engages in battle with the deposed villain. Their struggle takes them near Doom's time machine, and the doctor's henchman, Hauptmann, activates the device, throwing Doom and Iron Man back in time. Hauptmann then destroys the machine.
Monday, March 10, 2014
IRON MAN #148
"SIEGE!"
Plot/Writer: David Michelinie | Co-Plot-Finished Art: Bob Layton
Pencil Art: John Romita, Jr. | Letters: Joe Rosen | Colors: Bob Sharen
Editor: Jim Salicrup | Editor-in-Chief: Jim Shooter
Plot/Writer: David Michelinie | Co-Plot-Finished Art: Bob Layton
Pencil Art: John Romita, Jr. | Letters: Joe Rosen | Colors: Bob Sharen
Editor: Jim Salicrup | Editor-in-Chief: Jim Shooter
The Plot: In the Central American country of Costa Diablo, a Stark International office is invaded by revolutionaries, and the installation's staff are taken prisoner. Iron Man travels to Costa Diablo on a rescue mission, and after getting most of the staff out with Rhodey's aid, he invades the presidential palace to spring the Costa Diablo division head, Ricardo Pruz. But when he finally reaches the building's head office, he learns that Pruz was the true leader of the revolution, having embezzled funds and resources from Stark to arm his people.
Iron Man departs in defeat, cautioning Pruz to watch his back, lest he be betrayed just as he betrayed Tony Stark. And just a few days later, Mr. Pithins shows Stark an article reporting that Pruz was executed as a traitor by his own right hand man, General Caligerra.
Wednesday, March 5, 2014
IRON MAN #147
"HOLOCAUST AT HIGH NOON!"
Writer/Plot: David Michelinie | Finished Art/Plot: Bob Layton
Pencil Art: John Romita, Jr. | Letters: Joe Rosen | Colors: Bob Sharen & Roger Slifer
Editor: Jim Salicrup | Editor-in-Chief: Jim Shooter
Writer/Plot: David Michelinie | Finished Art/Plot: Bob Layton
Pencil Art: John Romita, Jr. | Letters: Joe Rosen | Colors: Bob Sharen & Roger Slifer
Editor: Jim Salicrup | Editor-in-Chief: Jim Shooter
The Plot: Iron Man temporarily subdues Blacklash and sets about saving Stark International from an all-consuming inferno. He rescues Pithins, Yvette, and the science students from last issue, and then grabs Mrs. Arbogast from the burning administration building. The fire department has the majority of the blaze contained, leaving only the admin building to be saved. Iron Man grabs an empty boxcar from a nearby train station, fills it with water from Long Island Sound, and extinguishes the last of the fire. However, despite Martinelli's best efforts, Blacklash escapes in the chaos.
Later, Martinelli explains to Tony that he was born Vince Martell, and "Victor Martinelli" is a creation of the Federal Witness Protection Program, following Martell's testifying against his former employers, the mob-run Center City Construction Company in Philadelphia. Martinelli suspects that the heads of Center City saw his photo in TIME and sent Blacklash to kill him.
Knowing Blacklash will try again, Tony and Martinelli prepare a trap for him. And sure enough, the next day Blacklash returns for Martinelli and corners him on Stark's airfield, where Iron Man gets the drop on him. Iron Man returns Blacklash to his bosses at Center City, telling them that if they'll forget about Martinelli, he will forget about them.
Monday, March 3, 2014
IRON MAN #146
"BLACKLASH...AND THE BURNING!"
Writer/Plot: David Michelinie | Finished Art/Plot: Bob Layton
Pencil Art: John Romita, Jr. | Letters: Jim Novak | Colors: Bob Sharen
Editor: Jim Salicrup | Editor-in-Chief: Jim Shooter
Writer/Plot: David Michelinie | Finished Art/Plot: Bob Layton
Pencil Art: John Romita, Jr. | Letters: Jim Novak | Colors: Bob Sharen
Editor: Jim Salicrup | Editor-in-Chief: Jim Shooter
The Plot: As Mr. Pithins escorts a group of science students around the Stark International grounds, Iron man arrives at the administration building and changes to Tony Stark. Tony greets the students, then welcomes SI's new Vice President, Yvette Avril from the Paris office. Meanwhile, security chief Martinelli gives Pithins an earful over his picture appearing in a TIME magazine article about SI. After work, Martinelli returns to his apartment, where he is attacked by Blacklash (formerly Whiplash). Martinelli's dog, Peanut, is killed in the scuffle, but Martinelli survives.
The next day, Blacklash arrives at Stark International to finish the job. He attacks the grounds and Martinelli's security team moves to fight back, but Iron Man soon arrives to take over. However, Iron Man's battle with Blacklash causes a fire to break out, and the entire Stark complex is engulfed in flames.
Wednesday, February 26, 2014
IRON MAN #145
"RAIDERS' RAMPAGE!"
Plot/Writer: David Michelinie | Plot/Finished Art: Bob Layton
Pencil Art: John Romita, Jr. | Letters: Joe Rosen | Colors: Roger Slifer
Editor: Jim Salicrup | Editor-in-Chief: Jim Shooter
Plot/Writer: David Michelinie | Plot/Finished Art: Bob Layton
Pencil Art: John Romita, Jr. | Letters: Joe Rosen | Colors: Roger Slifer
Editor: Jim Salicrup | Editor-in-Chief: Jim Shooter
The Plot: Tony and Rhodey check into the Park Sheraton Hotel in Dallas for the 24th Annual conclave of Electrical Engineers and Innovators. As Tony explores the convention floor, he bumps into several of his business rivals. The Stark International exhibit is soon assaulted by a trio of armored men calling themselves the Raiders. Tony changes to Iron Man and manages to beat the villains back, but not before they total much of the Stark exhibit.
The next day, Tony digs around for clues as to who was behind the attack, which targeted only his exhibit, but comes up empty. On Sunday, the final day of the convention, as Iron Man gives an exhibition for the assembled conventioneers, the Raiders attack again. They briefly have Iron Man on the ropes, but in the end he turns the tide and defeats them.
Later, Edwin Cord, head of the Cord Conglomerate, uses footage of the Raiders in action in an attempt to win a contract from SHIELD. But SHIELD Agent Burke is appalled at Cord's use of the mercenaries and their assault on Stark's private property, and orders Cord arrested instead.
Monday, February 24, 2014
IRON MAN #144
"SUNFALL"
Plot/Writer: David Michelinie | Plot/Finished Art: Bob Layton
Pencil Art: John Romita, Jr. | Letters: John Costanza | Colors: Bob Sharen
Editor: Jim Salicrup | Editor-in-Chief: Jim Shooter
Plot/Writer: David Michelinie | Plot/Finished Art: Bob Layton
Pencil Art: John Romita, Jr. | Letters: John Costanza | Colors: Bob Sharen
Editor: Jim Salicrup | Editor-in-Chief: Jim Shooter
The Plot: Iron Man and Sunturion team up to stop Star Well I from crashing in Sarasota, Florida. Sunturion super-charges Iron Man's deflector beam, allowing it to knock the plummeting space station off course, causing it to splash down in the Gulf of Mexico. Sunturion's body dissipates in the effort.
The next day, on Earth, Tony Stark is invited by Roxxon Oil to a celebrity golf benefit for the victims in Allantown, which is being played in the media as an anthrax outbreak. Tony tells Mrs. Arbogast to decline the invitation.
Continuity Notes: Sunturion laments the fact that Iron Man disabled Star Well's self-destruct system last issue (apparently forgetting that if he hadn't, they would both be dead right now).
The opening narration tells us that the Allantown incident occurred "two days ago", meaning that only 48 hours have passed since Tony Stark's yacht was hijacked in the Caribbean in issue #140.
Wednesday, February 19, 2014
IRON MAN #143
"METER ON THE SUN!"
Plot/Writer: David Michelinie | Plot/Finished Art: Bob Layton
Pencil Art: John Romita, Jr. | Letters: John Costanza | Colors: Bob Sharen
Editor: Jim Salicrup | Editor-in-Chief: Jim Shooter
Plot/Writer: David Michelinie | Plot/Finished Art: Bob Layton
Pencil Art: John Romita, Jr. | Letters: John Costanza | Colors: Bob Sharen
Editor: Jim Salicrup | Editor-in-Chief: Jim Shooter
The Plot: As Iron Man gapes in awe at the Roxxon space station, a meteor shower flies through the area. Iron Man is joined in fighting off the meteors by an armored figure named Sunturion, the space station's guardian. Sunturion invites Iron Man aboard, where the armored Avenger is greeted by Arthur Dearborn, the station's designer. Dearborn gives Iron Man a tour and explains that the station, called Star Well I, was created as a receptor and storage unit for solar radiation.
Dearborn admits that the Allentown, Iowa incident was the result of a malfunction in Star Well's systems. Iron Man is preparing to incarcerate Dearborn when Russian satellite attack drones enter Star Well's airspace, having tracked Iron Man to the station. Dearborn reveals that he and Sunturion are one and the same, then the duo heads out to stop the drones, after which they return to the station separately.
Dearborn receives a call from Jonas Hale with Roxxon, asking for a status report. But when Hale learns that Iron Man is aboard the station, he attempts to remotely detonate it. Iron man, however, has removed the self-destruct mechanism, keeping Star Well intact. Hale then begs Iron Man to let him remain aboard the station, but Iron Man refuses, resulting in a battle between the pair, which causes collateral damage that sends Star Well plummeting toward the Earth.
Monday, February 17, 2014
IRON MAN #142
"SKY DIE!"
Plot/Writer: David Michelinie | Plot/Finished Art: Bob Layton
Pencil Art: John Romita, Jr. | Letters: John Costanza | Colors: Bob Sharen
Editor: Jim Salicrup | Editor-in-Chief: Jim Shooter
Plot/Writer: David Michelinie | Plot/Finished Art: Bob Layton
Pencil Art: John Romita, Jr. | Letters: John Costanza | Colors: Bob Sharen
Editor: Jim Salicrup | Editor-in-Chief: Jim Shooter
The Plot: Tony, Bethany, and Ling return to Stark International to find a horde of Stark employees awaiting Tony's attention for various matters. Among these issues is the fact that a SHIELD unit, led by Nick Fury, has moved into Stark's analytical lab complex to investigate the mystery of Allentown. After making a date with Bethany for later that night, Tony speaks with Fury and learns the fate of Allentown. SHIELD has deduced that the town's citizens were killed by a bombardment of microwave radiation from outer space.
Leaving Fury and his men to their investigation, Tony returns to his office, where he is greeted by Senator Mountebank, who tries to persuade Tony to cover up the Allentown situation. Tony kicks Mountebank out and returns to work. Meanwhile, Stark's director of communications, Mike Trudeau, receives a call from a mysterious employer, ordering him to shut down SHIELD's investigation. Trudeau steals the recently rebuilt Jupiter Landing Vehicle and attacks the lab complex. Iron Man defeats the JLV and has Trudeau taken into custody.
Realizing more is going on than he'd initially realized, Iron Man dons his prototype outer space armor and flies to Allentown. Tracing the microwave radiation to its source, he flies into space and finds an enormous Roxxon space station orbiting the Earth.
Wednesday, February 12, 2014
IRON MAN #141
"THE CARIBBEAN CONNECTION"
Plot/Writer: David Michelinie | Plot/Finished Art: Bob Layton
Pencil Art: John Romita, Jr. | Letterer: John Costanza
Colorists: Nel Yomtov & Ed Hannigan | Editor: Jim Salicrup
Editor-in-Chief: Jim Shooter
Plot/Writer: David Michelinie | Plot/Finished Art: Bob Layton
Pencil Art: John Romita, Jr. | Letterer: John Costanza
Colorists: Nel Yomtov & Ed Hannigan | Editor: Jim Salicrup
Editor-in-Chief: Jim Shooter
The Plot: Iron Man searches the sea, but finds no sign of his stolen yacht. He returns to the raft holding Rhodey and changes back to Tony Stark just in time to be picked up by the authorities. Meanwhile, Bethany is taken before Justin Hammer, the mastermind behind the missing yacht. Hammer explains that he has been contracted by an American businessman to deliver a great deal of opium to the U.S., and he intends to use the various yachts hijacked by Force for that purpose. Before having Bethany locked up, Hammer reveals to her that they are aboard his new headquarters, a massive, shark shaped submarine.
Elsewhere, Tony has reconfigured Iron Man's sensors to detect heat signatures beneath the ocean's surface. He suits up and heads out, soon locating Hammer's sub. Force intercepts Iron Man, leading to an undersea duel which sees the armored Avenger using all his energy reserves to defeat his foe. Iron Man storms aboard the submarine and uses its power source to recharge his armor, then seeks out Hammer. The power fluctuations caused by our hero allow Bethany and captured passengers from various other stolen boats to escape their cells.
Iron Man confronts Hammer, but the villain triggers the submarine's self destruct system. Iron Man races to save Bethany rather than capture his enemy, allowing Hammer to escape. Our hero finds no sign of Bethany before the sub detonates, but when he returns to the surface, he finds her, along with the other hostages, aboard the captured yachts, having commandeered them during the sub's destruction.
Back at Tony's villa, our heroes enjoy some R&R while they recover. Meanwhile, in the United States, Nick Fury and SHIELD investigate Allentown, Iowa, where the town's two hundred residents are confirmed deceased.
Monday, February 10, 2014
IRON MAN #140
"THE USE OF DEADLY FORCE!"
Writer-Co-Plotters-Artist: David Michelinie & Bob Layton
Letterer: John Costanza | Colorists: Ben Sean & Bob Sharen | Editor: Jim Salicrup
Editor-in-Chief: Jim Shooter
Writer-Co-Plotters-Artist: David Michelinie & Bob Layton
Letterer: John Costanza | Colorists: Ben Sean & Bob Sharen | Editor: Jim Salicrup
Editor-in-Chief: Jim Shooter
The Plot: Tony has taken Bethany, Rhodey, Ling, and Dr. Ehrmann down to his private island in the Bahamas to facilitate Ling's recovery from her recent beating. As the group relaxes and frolics, nearby a cruise ship is hijacked by an armored villain his lackies, the latest in a string of similar takeovers.
The next day, while Tony and Rhodey go SCUBA diving, Tony's yacht is taken by those same hijackers, their leader revealed as the Force. Bethany manages to throw Tony's briefcase into the sea, but Force's men hurl a pair of concussion grenades along with it. Rhodey is knocked out shielding Tony from the grenades, allowing Tony to change into Iron Man unobserved.
Iron Man leaves Rhodey on a life raft, then goes after his yacht. But his flight is intercepted by the Force's men, aboard flying jet-skis. Iron Man defeats the goons, but the yacht has vanished.
Back in the U.S.A., the citizens of a small town called Allentown, Iowa all drop dead at the same time.
Wednesday, February 5, 2014
IRON MAN #139
"CHAPTER III: FAÇADES, RUSES & MASQUES"
Writer-Co-Plotters-Artist: David Michelinie & Bob Layton
Letterer: John Costanza | Colorist: Ed Hannigan | Editor: Jim Salicrup
Editor-in-Chief: Jim Shooter
Writer-Co-Plotters-Artist: David Michelinie & Bob Layton
Letterer: John Costanza | Colorist: Ed Hannigan | Editor: Jim Salicrup
Editor-in-Chief: Jim Shooter
The Plot: Madame Masque explains to Tony that she rejoined the Maggia following their split, and that she had intended to have Bethany beaten to keep her away from Tony. As Masque finishes her story, Rhodey bursts into the room on a forklift, pursued by Dreadnoughts. Tony dons his helmet and flies Bethany to safety, then returns to the Technical Press building to aid Rhodey. Despite Iron Man's orders to return to Stark International, Bethany heads back to the building as well, intent on settling Ling's score with Madame Masque.
While Iron Man battles the Dreadnoughts, Rhodey attempts to retrieve the energizer link, but runs afoul of Spymaster. Spymaster attempts escape in the Technical Press helicopter, but Rhodey pursues in a gyrocopter and his fancy flying causes Spymaster to crash. Iron Man defeats the Dreadnoughts while Bethany confronts Madame Masque. When Bethany tells Masque that Tony almost destroyed himself with alcohol after she left, Masque flies into a rage and attacks. But Bethany dodges Masque's gunfire and disarms her. After lecturing Masque on the true meaning of love, she lets her go and reunites with Iron Man and Rhodey outside the building.
Subscribe to:
Posts (Atom)